The Site
This is a key factor and where it all begins. After years of searching for the perfect piece of property we knew we had found "it" within 15 minutes of seeing it. It had great southern exposure (passive solar), where the house site would be, and it was in a meadow so we didn't have to take down a single mature tree, just some small pine and birch (less than 10' high). It's close to town and only a 7 minute commute to my business.
The Design
We did a ton of research, talked to architects, visited many homes on solar home tours and you know what we ended up with? A box. A simple open floor plan that suits the way we live and utilizes that open space to distribute heating, cooling and natural light. Couldn't be simpler and that's the point. Minimum material is used, maximum efficiency is reached. Key credos in "green" home building.
The Foundation
We used a prefab foundation (Superior Walls) and as anyone who knows about green homes will tell you, prefab is about efficiency and minimum waste. It went up fast with no waste products on site (plywood, left over concrete, etc.). It's super insulated and we went so far as to add another 2" of rigid insulation on the walls to minimize any thermal bridging with another 3" rigid underneath the heat sink.
The Shell
Why more people don't use SIP panels is beyond me. ALL homes should utilize this technology. It would save hundreds of tons of waste from going into landfills. It would make homes so tight and efficient that minimum fuel and electricity would be used to operate them. The list of advantages would make a long blog entry in itself. It you are going to build a new home or have an addition, give SIP's some serious thought.
The Windows and Doors
Anderson 400 for everything. Casement and awning windows (when closed they make a tighter seal than sliders or double hung). The doors are standard swing, even for the patio. Sliders just don't seal well. We opted for Smartglass film on all southern doors and windows to protect the interior from UV.
The Heating System
In one word; radiant. We used 7/8" Pex tubing for greater heat distribution for all three layers (Heat sink, in slab and staple up under the second floor). Our main source of heat will be from 4 arrays of 16 tube solar collectors with a backup of a propane fired hot water on-demand Takagi heater which we hope will barely ever have to fire up. As far as our "Heat Sink" system, look to an earlier blog post for an explanation.
The Siding and Trim
I'm not a fan of maintenance. Not to mention that painting and patching a home takes time and chemicals. We used Hardie board siding and Azek trim. I'll never have to get on a ladder and paint. Ever.
Also, we used old fashioned tar paper for the vapor barrier as opposed to Tyvek. Tyvek is crap. Any contractor worth their salt would tell you the same. It's just well marketed.
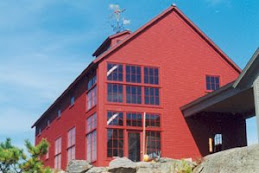
The Roof
We almost went for a traditional asphalt shingle roof because of our budget but it just didn't sit right with me. Here we are building an environmentally minded home and I'm going to put a petroleum based product, which when it's life cycle ends, goes straight into a landfill? I bit the bullet on this and went with a galvanized metal roof and installed it myself with the help of a couple guys from my shop. It was a bitch, especially the cupola, but it's going to last my lifetime and when it's time to change it out, completely recyclable.
The Floors
Our home is slab on grade. No basement. Another common question we get from folks when they hear that is "where are you going to keep your stuff?". I usually pause before I reply, allowing them a moment to think about their question even though it doesn't do any good. Think about that question. "Where am I going to keep a bunch of crap that I don't need or use and stockpile in a place that I rarely occupy except to clean out in order to have tag sales?" But I digress. We're leaving the concrete exposed. I sanded it to a "baby ass smooth" and then we stained it using a soy based concrete stain called EcoProCote. It came out sweet.
For our second floor we used Teragren Strand Bamboo flooring which is phenomenally hard and looks beautiful.
Interior Walls and Trim
First off, we did drywall returns on all the windows and doors. Not only does this give a very clean and modern look, it saves a ton of money (and material) normally spent on trim. Floor board trim was used primarily to cover the electrical chase for the outlets (SIP panels, while a great product, pose a challenge to electricians). In this case we used more of the Teragren Bamboo product. It's a carmelized bamboo plywood that we ripped into 8" strips and cleared with a water based poly satin. It looks trick and contrast beautifully with the floor and walls.
All the walls and ceilings were painted with a Benjamin Moore product called Harmony. It's a no VOC paint that after 24 hours of drying left absolutely no smell and looked clean, bright and seamless.
All right, this is going to be a hell of a long list. Need to take a breather and get back to the house!


2 comments:
Jeremy
I am wondering, and perhaps others who are considering metal roofs are wondering with me, what are the challenges of working with this material. Was it the roof pitch or was it something inherent in the material. Do you see any way it could be installed with a ventilated air space, say on vertical furring strips? Thanks
Gene DeJoannis
Gene,
Guess I don't get to this blog too often...
The biggest challenge on our roof was the pitch (8/12 or 33 degrees). Having to nail in the cleats and move them around as we installed first the weather guard and then the metal panels was a time consuming, precarious and hot (mid July) endeavor. The metal panels themselves are a breeze to install; pre-cut to length and fastened with a special self-tapping screw that has a thick rubber washer.
The toughest part of the roof was the cupola with it's angles. Cutting the metal panels to the angles, capping everything just right proved to be time consuming and we spent the better part of an entire day just on the cupola alone.
Luckily I had an experienced roofing guy with me and that proved invaluable. I do not recommend anyone attempting this to do it without at least some coaching from an experienced metal roofer.
In regards to installing it with a ventilated air space, the metal has corrugations which allow some movement of air. Since ours was installed over a SIP roof, there was really was no additional air space needed. The problem with using vertical furring strips would be you would need to know exactly where they are as you installed the roof because they are your attachment points. Would be much more complicated and time consuming to do so.
Post a Comment